此篇文档记录通过 Flash 下载工具 完成 Flash 加密 功能的实现,此文档不启用 Flash 加密方案的 NVS 加密。
-
Flash 加密启动的验证代码:esp-idf/components/bootloader_support/src/flash_encrypt.c
-
Flash 加密测试例程:esp-idf/examples/security/flash_encryption
支持 Flash 加密的产品
| 芯片型号 | 支持的密钥类型 |
|---|---|
| ESP32 | AES-128(256-bit 密钥) |
| ESP32-S2 | AES-128(256-bit 密钥) & AES-256(512-bit 密钥) |
| ESP32-S3 | AES-128(256-bit 密钥) & AES-256(512-bit 密钥) |
| ESP32-C2 | SHA256(128-bit 密钥)& AES-128 (256-bit 密钥) |
| ESP32-C3 | AES-128(256-bit 密钥) |
| ESP32-C6 | AES-128(256-bit 密钥) |
| ESP32-H2 | AES-128(256-bit 密钥) |
Flash 加密 概述
Flash 加密 功能用于加密与 ESP32 系列产品搭载使用的片外 Flash 芯片中的固件,可用于保护应用程序的安全。
分区表设置,例如:
# Name,   Type, SubType, Offset,   Size, Flags
# Note: if you have increased the bootloader size, make sure to update the offsets to avoid overlap
nvs,      data, nvs,     ,        0x4000,
otadata,  data, ota,     ,        0x2000,
phy_init, data, phy,     ,        0x1000, encrypted
factory,  app,  factory, ,        1M,
ota_0,    app,  ota_0,   ,        1M,
ota_1,    app,  ota_1,   ,        1M,
nvs_key,  data, nvs_keys,,        0x1000, encrypted
# Custom NVS data partition
custom_nvs, data, nvs,      ,  0x6000,
storage, data, 0xff,     ,  0x1000, encrypted
开启 Flash 加密后,会默认加密以下类型的数据:
- 二级引导程序 (固件引导加载程序)
- 分区表
- NVS 密钥分区
- Otadata
- 所有 app 类型的分区
NVS 密钥分区 用于存
nvs_key,nvs_key用于加密nvs分区。
其他类型的数据将视情况进行加密:
- 分区表中标有
encrypted标志的分区。如需了解详情,请参考 加密分区标志。 - 如果启用了安全启动,则会对安全启动引导程序摘要进行加密。
基于 Flash 下载工具 完成 Flash 加密 功能,支持使用随机密钥或指定密钥来加密固件。
ESP32S3 的 Flash 加密支持使用 AES-128(256 位密钥) 和 AES-256(512 位密钥) 。其中:
AES-128(256 位密钥)只需占用一个 eFuse BLOCK;AES-256(512 位密钥)需要占用两个eFuse BLOCK。
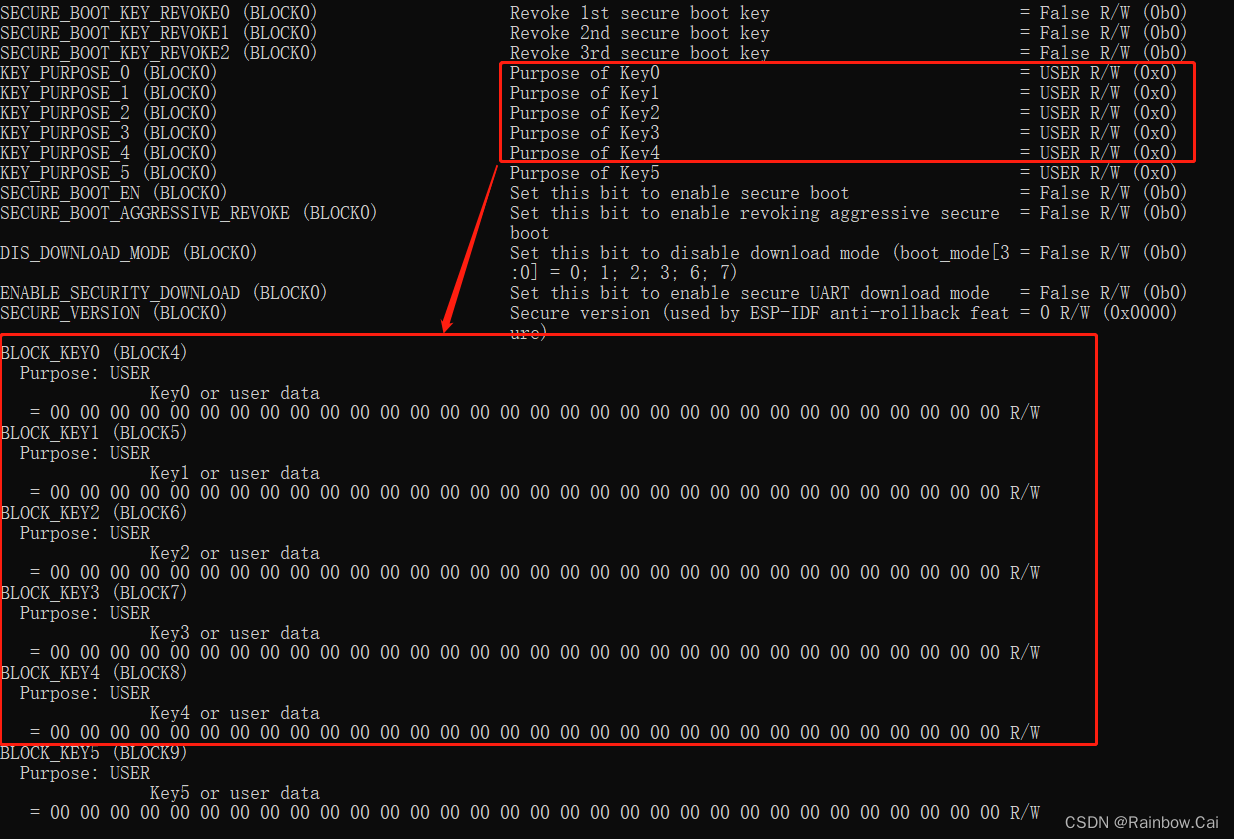
用户可以根据需求自行选择 AES-128(256 位密钥) 和 AES-256(512 位密钥) ,详细说明参见参见 使用主机生成的密钥。另外,Flash 加密密钥存储在芯片的 eFuse BLOCK 中,但 ESP32-S3 的 Flash 加密密钥仅支持存储在 BLOCK_KEY0(BLOCK4)~ BLOCK_KEY4(BLOCK8)中,参见 eFuse BLOCK 说明。如下:
如何获取不同类型的 Flash 加密密钥?
用户可以通过如下方式生成用于 Flash 加密 的密钥
【仅 ESP32-C2】通过 esptool 工具,运行如下指令生成SHA-256(128 位密钥)Flash 加密 密钥,参见 ESP32-C2 使用主机生成的密钥说明
espsecure.py generate_flash_encryption_key --keylen 128 flash_encryption_key.bin
【仅 ESP32-C2】对于 SHA-256(128 位密钥) 会写入 eFuse BLOCK 的 LOW 128 bit ,如下:

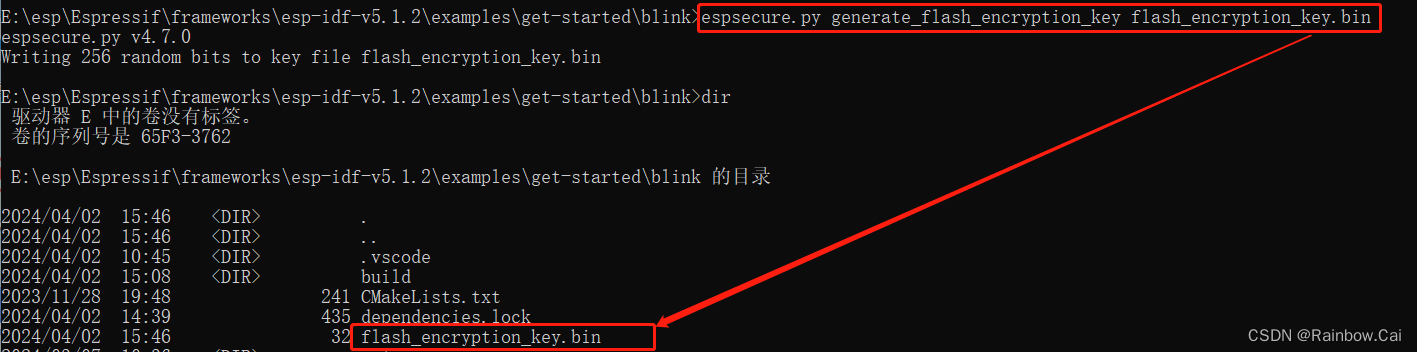
【其他系列的产品】通过 esptool 工具,运行如下指令生成AES-128(256 位密钥)Flash 加密 密钥,参见 使用主机生成的密钥说明
espsecure.py generate_flash_encryption_key flash_encryption_key.bin
flash_encryption_key.bin为生成的(自定义名称)的 Flash 加密密钥文件
默认生成AES-128(256 位密钥)
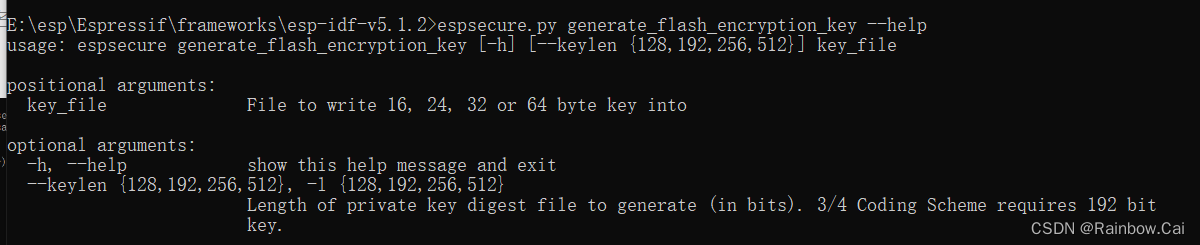
【ESP32-S2 / ESP32-S3】通过 esptool 工具,运行如下指令生成AES-256(512 位密钥)Flash 加密 密钥,参见 使用主机生成的密钥 说明
espsecure.py generate_flash_encryption_key --keylen 512 flash_encryption_key.bin
如果您正在使用 ESP32S3 系列的芯片,并且希望开启 Flash 加密 的功能,从量产生产环境的角度考虑,我们推荐使用 Flash 下载工具(最新版本)来完成 Flash 加密 过程。
通过 Flash 下载工具 完成 Flash 加密 功能的实现流程如下:
- 基于 Flash 下载工具 开启
Flash 加密设置 - 基于 Flash 下载工具 导入
Flash 加密密钥(可选) - 在下载固件过程直接将
Flash 加密的密钥写入芯片的eFuse BLOCK中 - 同时写 eFuse 控制位(
FLASH_CRYPT_CNT)来开启 Flash 加密 的功能。
通过 Flash 下载工具 来完成 Flash 加密 功能,从操作流程上具有如下优点:
- 固件下载完成后,即完成了 Flash 加密 的全部流程
- 芯片第一次上电启动时直接运行
密文固件 - 可规避在 Flash 加密流程中出现
掉电或供电不稳带来的风险
使用 Flash 下载工具(最新版本)完成 Flash 加密 的具体流程如下:
1. 按照如上获取 Flash 加密秘钥的方式,获取 AES-128(256 位密钥)
Flash 下载工具不支持使用
AES-256(512 位密钥)
参见 使用主机生成的密钥说明
espsecure.py generate_flash_encryption_key flash_encryption_key.bin
flash_encryption_key.bin为生成的(自定义名称)的 Flash 加密密钥文件
默认生成AES-128(256 位密钥)
2. 软件配置
此文档
不启用Flash 加密方案的NVS 加密
- 软件分区表设置参考
# Name,   Type, SubType, Offset,   Size, Flags
# Note: if you have increased the bootloader size, make sure to update the offsets to avoid overlap
nvs,      data, nvs,     ,        0x4000,
otadata,  data, ota,     ,        0x2000,
phy_init, data, phy,     ,        0x1000, encrypted
factory,  app,  factory, ,        1M,
ota_0,    app,  ota_0,   ,        1M,
ota_1,    app,  ota_1,   ,        1M,
# Custom NVS data partition
storage, data, 0xff,     ,  0x1000, encrypted
注意:
phy_init和storage分区默认不被加密,若需要加密的话,则增加encrypted标记nvs分区默认不被加密,若需要加密的话,需要启用 NVS 加密功能,使用nvs_key进行加密
-
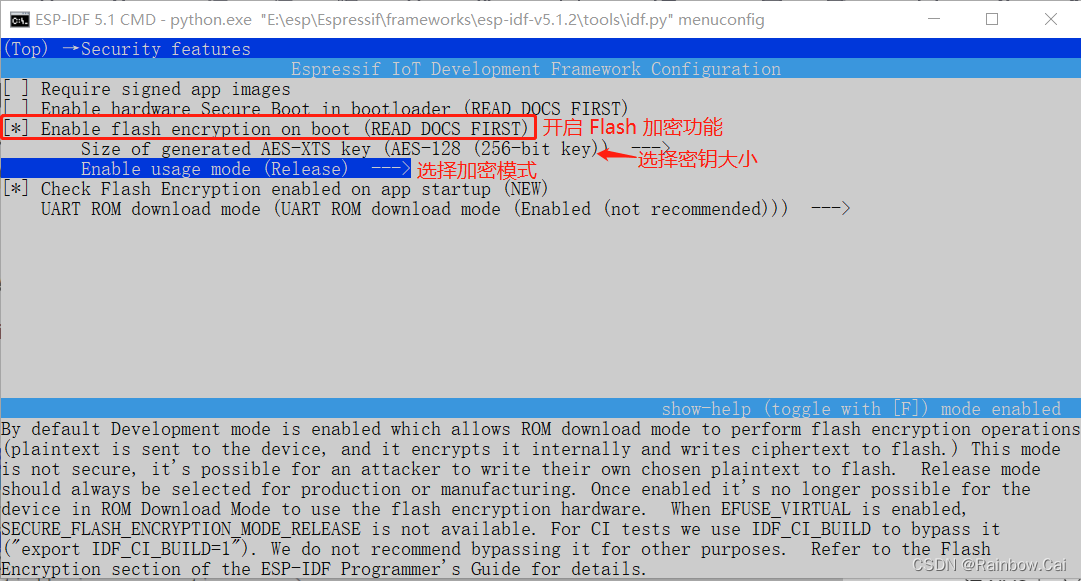
在 esp-idf SDK 编译环境中,需要开启 Flash 加密 的软件配置
→ Security features
- 由于 Flash 下载工具
仅支持 AES-128(256 位密钥),因此推荐使用AES-128(256 位密钥)。在软件配置中注意选择Size of generated AES-XTS key (AES-128 (256-bit key))的配置。 Enable usage mode可以选择Release模式或Development (NOT SECURE)模式设置。- 当选择 Release 模式时,会将
SPI_BOOT_CRYPT_CNT的 eFuse 控制位设置为0xb111; - 若设置为
Development (NOT SECURE)模式,则将SPI_BOOT_CRYPT_CNT的 eFuse 控制位设置为0b001,此模式支持 Flash 解密,共提供两次解密机会。量产推荐选择 Release 模式。
- 当选择 Release 模式时,会将
- 由于 Flash 下载工具
-
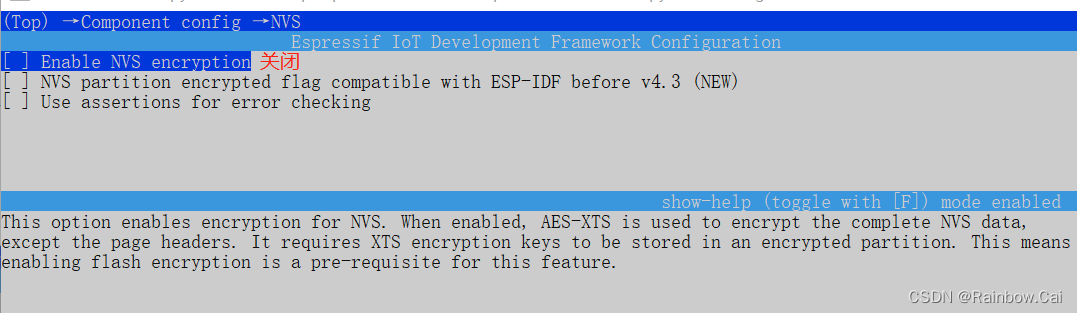
关闭 NVS 加密
由于 开启 Flash 加密后,
默认也会使能 NVS 加密,如果没有进行 NVS 加密的相关设置,因此需要关闭 NVS 加密的配置→ Component config → NVS
-
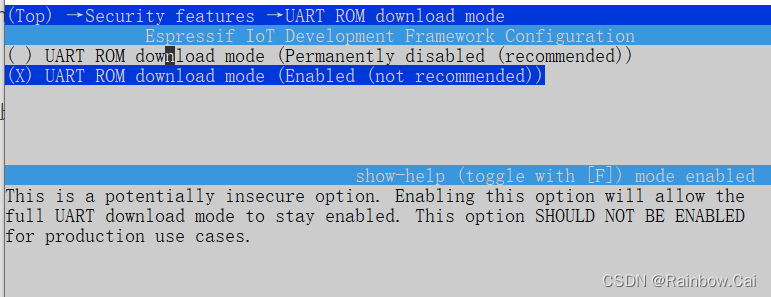
同时,注意
UART ROM download mode的设置,如果不希望禁用下载模式,推荐选择UART ROM download mode (Enabled (not recommended))模式。不同下载模式的配置选项说明参见:CONFIG_SECURE_UART_ROM_DL_MODE→ Security features → UART ROM download mode
-
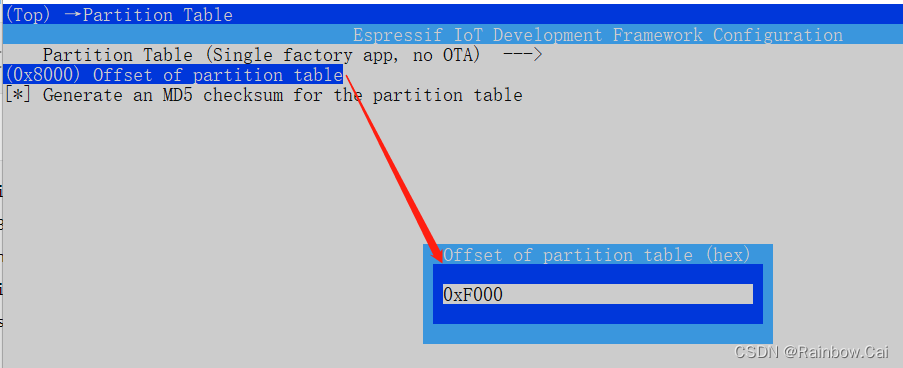
由于 Flash 加密 功能将
加大 Bootloader固件,因此需要增大分区表的偏移地址的设置,如下:默认是
0x8000, 可以调大为0xF000idf.py menuconfig —> Partition Table
3. 然后编译工程,获取编译固件:
-
使用如下指令编译当前工程
idf.py build -
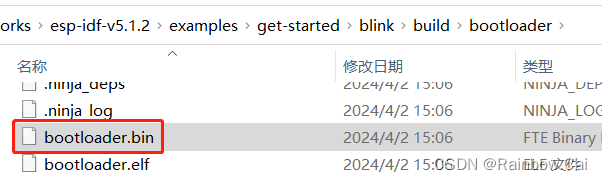
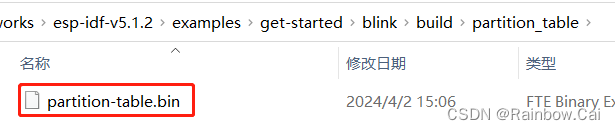
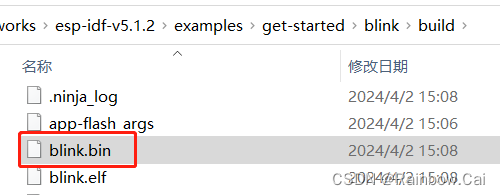
编译完成后会生成如下固件:
- 未加密的
bootloader-unsigned.bin - 未加密的
partition-table.bin - 未加密的
blink-unsinged.bin
如下:
- 编译后的文件可以在本地路径下找到:
- 未加密的
-
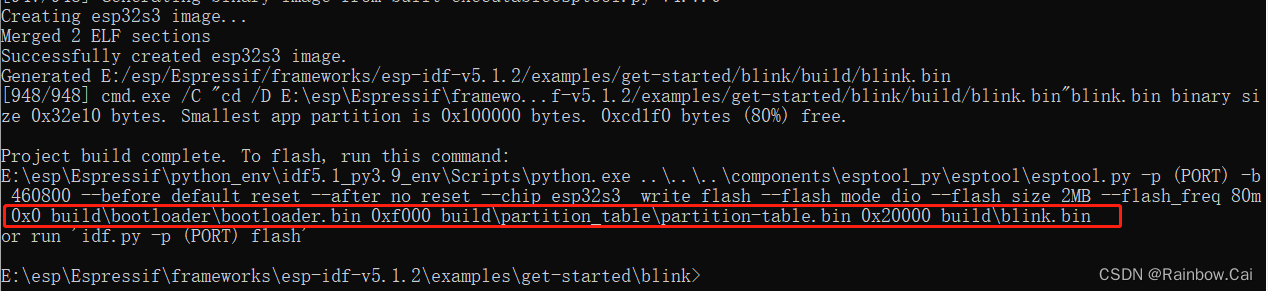
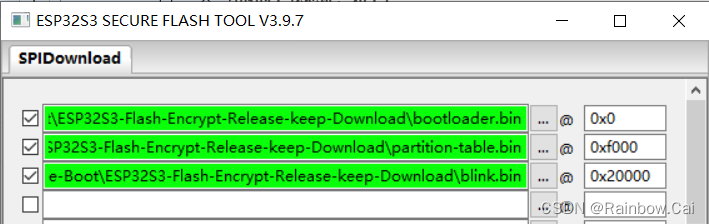
通过编译完成的日志打印,可以看到
固件对应的下载地址如下:0x0: bootloader.bin
0xf000: partition-table.bin
0x20000: blink.bin
4. Flash 下载工具 配置
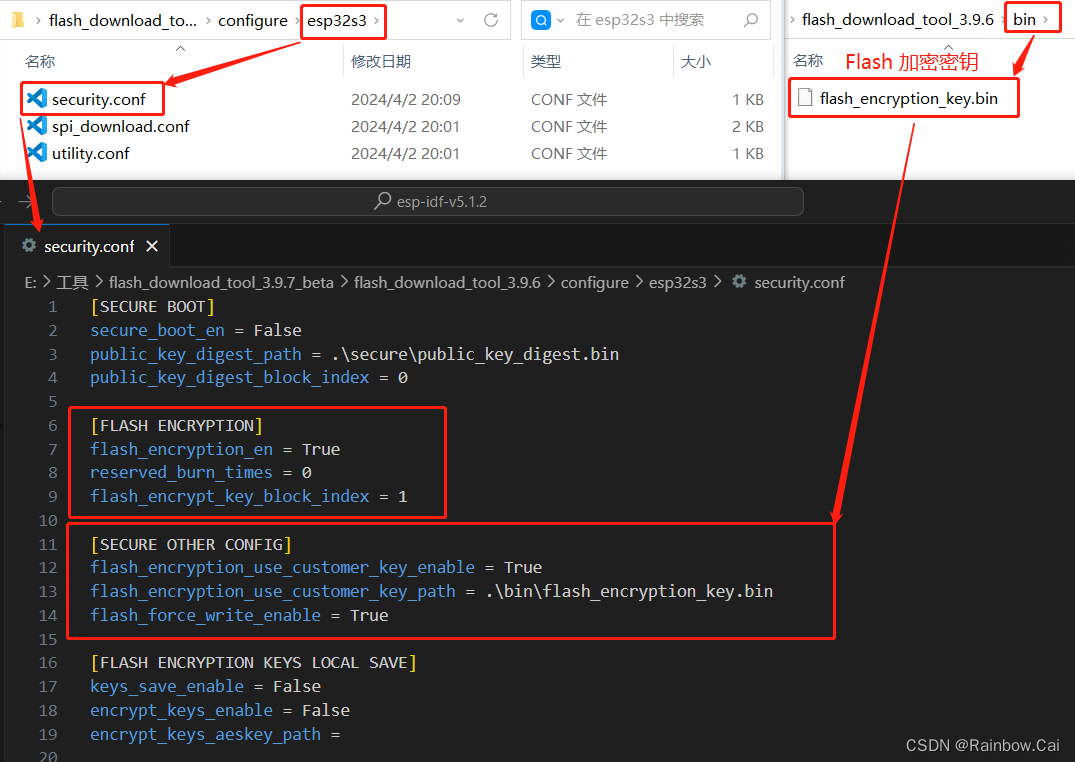
将 Flash 加密密钥文件放到 Flash 下载工具 中的
bin文件夹下
-
在 Flash 下载工具 中的
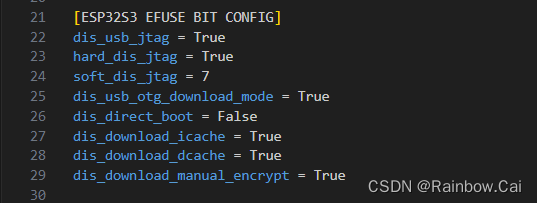
configure\esp32s3\security.conf配置文件中, 开启Flash 加密的配置选项,如下:[FLASH ENCRYPTION] flash_encryption_en = True reserved_burn_times = 0 flash_encrypt_key_block_index = 1 [SECURE OTHER CONFIG] flash_encryption_use_customer_key_enable = True flash_encryption_use_customer_key_path = .\bin\flash_encryption_key.bin flash_force_write_enable = True [ESP32S3 EFUSE BIT CONFIG] dis_usb_jtag = True hard_dis_jtag = True soft_dis_jtag = 7 dis_usb_otg_download_mode = True dis_direct_boot = False dis_download_icache = True dis_download_dcache = True dis_download_manual_encrypt = True -
[FLASH ENCRYPTION]flash_encryption_en = True:开启 Flash 加密reserved_burn_times = 0: 设置预留烧录次数,此设置若设置为0,对应的SPI_BOOT_CRYPT_CNT的 eFuse 控制位将写为0b111,即表示设置为 Flash 加密的Release 模式;若设置为3,对应的SPI_BOOT_CRYPT_CNT的 eFuse 控制位将写为0xb001,即表示设置为 Flash 加密的Develop 模式。当软件配置设置为Release 模式时,此参数应设置为0。flash_encrypt_key_block_index = 1: 设置 Flash 加密密钥的存储位置,仅适用于 ESP32-C 系列和 ESP32-S 系列,Flash 加密密钥的存储范围可选0~4。即支持设置BLOCK_KEY0 ~ BLOCK_KEY4,对应eFuse BLOCK4 ~ BLOCK8。注:ESP32-C2只可选0。
-
[SECURE OTHER CONFIG]flash_encryption_use_customer_key_enable = True: 是否使用客户指定的 Flash 加密密钥flash_encryption_use_customer_key_path = .\bin\flash_encrypt_key.bin: 设置 Flash 加密密钥的路径,注意:此路径( .\bin\flash_encrypt_key.bin)是基于 Flash 下载工具的路径为当前路径flash_force_write_enable = False: 配置烧录时是否跳过加密和安全启动检查。默认为False,当设置为False时,若对已经开启 Flash 加密或安全启动的产品烧录时会弹窗报错。当设置为True时,在对未禁用下载模式,但已经开启Flash加密或安全启动的产品烧录时,将不做安全检查。
如下配置建议与 menuconfig 中的默认软件设置保持一致
这些配置在 esp-idf/components/soc/esp32s3/include/soc /Kconfig.soc_caps.in 文件中被设置
[ESP32S3 EFUSE BIT CONFIG]dis_usb_jtag = True:设置 eFuse 中的DIS_USB_JTAG位为True(0b1)hard_dis_jtag = True:设置 eFuse 中的HARD_DIS_JTAG位为True(0b1)soft_dis_jtag = 7:设置 eFuse 中的SOFT_DIS_JTAG位为0b111dis_usb_otg_download_mode = True:设置 eFuse 中的DIS_USB_OTG_DOWNLOAD_MODE位为0b1dis_direct_boot = Flase: 设置 eFuse 中的DIS_DIRECT_BOOT位dis_download_icache = True:设置 eFuse 中的DIS_DOWNLOAD_ICACHE位为True(0b1)dis_download_dcache = True:设置 eFuse 中的DIS_DOWNLOAD_DCACHE位为True(0b1)dis_download_manual_encrypt = True:设置 eFuse 中的DIS_DOWNLOAD_MANUAL_ENCRYPT位设置为True(0b1)。在 Flash 加密的Release 模式下,此配置必须配置为True;若使用 Flash 加密的Develop 模式,此配置可以为False
注意:如上配置选项一旦生效,不可恢复为默认状态。
若 Flash 下载工具的 eFuse 安全配置 与 menuconfig 例的安全设置未保持一致,会在固件运行启动之后,报错如下日志:
E (313) flash_encrypt: Flash encryption settings error: app is configured for RELEASE but efuses are set for DEVELOPMENT
E (325) flash_encrypt: Mismatch found in security options in bootloader menuconfig and efuse settings. Device is not secure.
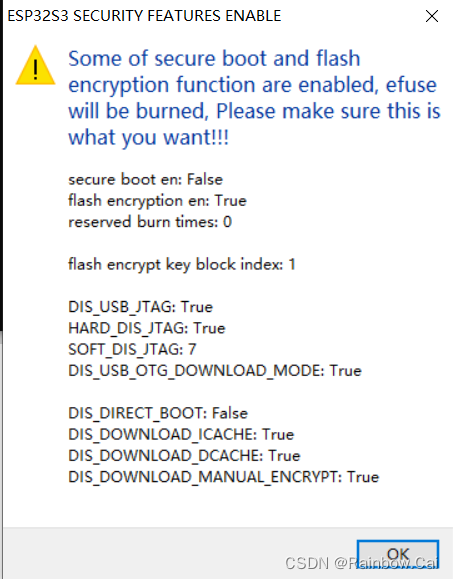
5. 重新启动 Flash 下载工具
开启 Flash 下载工具 后 ,将会读取 configure\esp32s3\security.conf 配置文件信息,如下:
6. 导入待下载的固件
按照不同的分区添加待下载的固件,并设置对应的下载地址,如下:
不支持直接导入
合并的固件
7. 烧写固件
固件将在下载过程中会将Flash 加密密钥写入到芯片 eFuse BLOCK_KEY1 中,并使能 Flash 加密 的 eFuse 控制位(SPI_BOOT_CRYPT_CNT)和 使能 ESP32S3 EFUSE BIT CONFIG 对应配置,如下黑框日志:
test offset : 61440 0xf000
case ok
test offset : 131072 0x20000
case ok
.
Changing baud rate to 115200
Changed.
NO XMC flash detected!
Encrypting bin file ...please wait!!!
Using 256-bit key
Encrypting bin file ...please wait!!!
Using 256-bit key
Encrypting bin file ...please wait!!!
Using 256-bit key
burn secure key ...
Burn keys to blocks:
- BLOCK_KEY1 -> [b6 5e 55 3e 63 c8 aa c6 13 ca f7 80 8f 24 d0 67 99 7e 98 03 80 b6 38 82 e4 41 2b a8 26 ec d2 62]
Reversing byte order for AES-XTS hardware peripheral
'KEY_PURPOSE_1': 'USER' -> 'XTS_AES_128_KEY'.
Disabling write to 'KEY_PURPOSE_1'.
Disabling read to key block
Disabling write to key block
Check all blocks for burn...
idx, BLOCK_NAME, Conclusion
[00] BLOCK0 is not empty
(written ): 0x0000000080000000000000000000d1f50000000000000000
(to write): 0x000000000000000000000000400000000000000201000200
(coding scheme = NONE)
[05] BLOCK_KEY1 is empty, will burn the new value
.
This is an irreversible operation!
BURN BLOCK5 - OK (write block == read block)
BURN BLOCK0 - OK (all write block bits are set)
Reading updated efuses...
Successful
The efuses to burn:
from BLOCK0
- SPI_BOOT_CRYPT_CNT
Burning efuses:
- 'SPI_BOOT_CRYPT_CNT' (Enables flash encryption when 1 or 3 bits are set and disabled otherwise) 0b000 -> 0b111
Check all blocks for burn...
idx, BLOCK_NAME, Conclusion
[00] BLOCK0 is not empty
(written ): 0x0000000080000000000000004000d1f50000000201000200
(to write): 0x000000000000000000000000001c00000000000000000000
(coding scheme = NONE)
.
This is an irreversible operation!
BURN BLOCK0 - OK (all write block bits are set)
Reading updated efuses...
Checking efuses...
Successful
WARNING: - compress and encrypt options are mutually exclusive
Will flash uncompressed
Took 0.25s to erase flash block
Took 0.03s to erase flash block
Took 0.81s to erase flash block
The efuses to burn:
from BLOCK0
- DIS_USB_JTAG
- DIS_PAD_JTAG
- SOFT_DIS_JTAG
- DIS_USB_OTG_DOWNLOAD_MODE
- DIS_DOWNLOAD_ICACHE
- DIS_DOWNLOAD_DCACHE
- DIS_DOWNLOAD_MANUAL_ENCRYPT
Burning efuses:
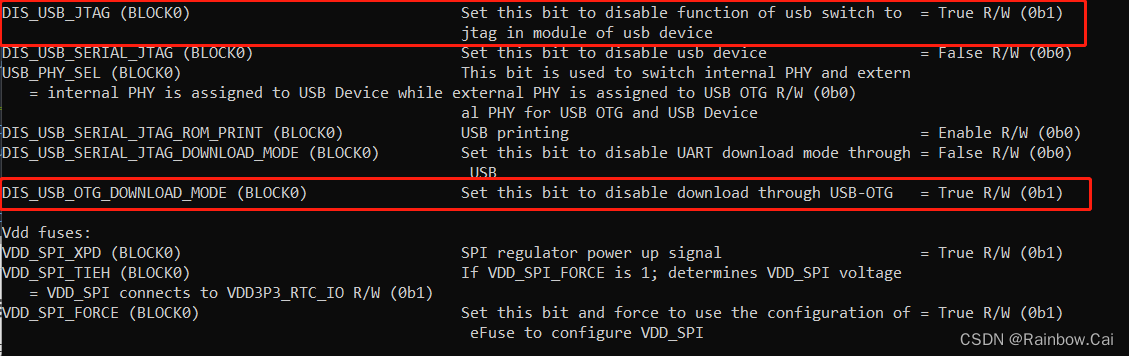
- 'DIS_USB_JTAG' (Set this bit to disable function of usb switch to jtag in module of usb device) 0b0 -> 0b1
- 'DIS_PAD_JTAG' (Set this bit to disable JTAG in the hard way. JTAG is disabled permanently) 0b0 -> 0b1
- 'SOFT_DIS_JTAG' (Set these bits to disable JTAG in the soft way (odd number 1 means disable ). JTAG can be enabled in HMAC module) 0b000 -> 0b111
- 'DIS_USB_OTG_DOWNLOAD_MODE' (Set this bit to disable download through USB-OTG) 0b1 -> 0b1
The same value for DIS_USB_OTG_DOWNLOAD_MODE is already burned. Do not change the efuse.
- 'DIS_DOWNLOAD_ICACHE' (Set this bit to disable Icache in download mode (boot_mode[3:0] is 0; 1; 2; 3; 6; 7)) 0b0 -> 0b1
- 'DIS_DOWNLOAD_DCACHE' (Set this bit to disable Dcache in download mode ( boot_mode[3:0] is 0; 1; 2; 3; 6; 7)) 0b0 -> 0b1
- 'DIS_DOWNLOAD_MANUAL_ENCRYPT' (Set this bit to disable flash encryption when in download boot modes) 0b0 -> 0b1
Check all blocks for burn...
idx, BLOCK_NAME, Conclusion
[00] BLOCK0 is not empty
(written ): 0x000000008000000000000000401cd1f50000000201000200
(to write): 0x00000000000000000040000000000000001f0c0000000000
(coding scheme = NONE)
.
This is an irreversible operation!
BURN BLOCK0 - OK (all write block bits are set)
Reading updated efuses...
Checking efuses...
Successful
固件下载完成后,整个 Flash 加密的流程也完成。
8. 运行固件:
固件将在第一次上电启动时:
- 检查 Flash 加密 功能是否被开启
- 然后验证被加密的固件
- 验证成功,则固件正常运行
运行日志如下:
ESP-ROM:esp32s3-20210327
Build:Mar 27 2021
rst:0x1 (POWERON),boot:0x8 (SPI_FAST_FLASH_BOOT)
SPIWP:0xee
mode:DIO, clock div:1
load:0x3fce3980,len:0x2b74
load:0x403c9700,len:0x4
load:0x403c9704,len:0xc00
load:0x403cc700,len:0x44f4
entry 0x403c9908
I (36) boot: ESP-IDF v5.1.2-dirty 2nd stage bootloader
I (37) boot: compile time Apr  3 2024 19:33:41
I (37) boot: Multicore bootloader
I (40) boot: chip revision: v0.1
I (44) boot.esp32s3: Boot SPI Speed : 80MHz
I (49) boot.esp32s3: SPI Mode       : DIO
I (54) boot.esp32s3: SPI Flash Size : 2MB
I (58) boot: Enabling RNG early entropy source...
I (64) boot: Partition Table:
I (67) boot: ## Label            Usage          Type ST Offset   Length
I (75) boot:  0 nvs              WiFi data        01 02 00010000 00006000
I (82) boot:  1 phy_init         RF data          01 01 00016000 00001000
I (90) boot:  2 factory          factory app      00 00 00020000 00100000
I (97) boot: End of partition table
I (101) esp_image: segment 0: paddr=00020020 vaddr=3c020020 size=0a518h ( 42264) map
I (118) esp_image: segment 1: paddr=0002a540 vaddr=3fc91400 size=0289ch ( 10396) load
I (121) esp_image: segment 2: paddr=0002cde4 vaddr=40374000 size=03234h ( 12852) load
I (130) esp_image: segment 3: paddr=00030020 vaddr=42000020 size=18c74h (101492) map
I (155) esp_image: segment 4: paddr=00048c9c vaddr=40377234 size=0a150h ( 41296) load
I (171) boot: Loaded app from partition at offset 0x20000
I (171) boot: Checking flash encryption...
I (171) flash_encrypt: flash encryption is enabled (0 plaintext flashes left)
I (179) boot: Disabling RNG early entropy source...
I (195) cpu_start: Multicore app
I (196) cpu_start: Pro cpu up.
I (196) cpu_start: Starting app cpu, entry point is 0x40375264
I (0) cpu_start: App cpu up.
I (214) cpu_start: Pro cpu start user code
I (214) cpu_start: cpu freq: 160000000 Hz
I (214) cpu_start: Application information:
I (217) cpu_start: Project name:     blink
I (222) cpu_start: App version:      v5.1.2-dirty
I (227) cpu_start: Compile time:     Apr  3 2024 19:33:32
I (233) cpu_start: ELF file SHA256:  3ed5040cad36c2b8...
I (239) cpu_start: ESP-IDF:          v5.1.2-dirty
I (244) cpu_start: Min chip rev:     v0.0
I (249) cpu_start: Max chip rev:     v0.99
I (254) cpu_start: Chip rev:         v0.1
I (259) heap_init: Initializing. RAM available for dynamic allocation:
I (266) heap_init: At 3FC94500 len 00055210 (340 KiB): DRAM
I (272) heap_init: At 3FCE9710 len 00005724 (21 KiB): STACK/DRAM
I (279) heap_init: At 3FCF0000 len 00008000 (32 KiB): DRAM
I (285) heap_init: At 600FE010 len 00001FD8 (7 KiB): RTCRAM
I (292) spi_flash: detected chip: gd
I (296) spi_flash: flash io: dio
W (299) spi_flash: Detected size(16384k) larger than the size in the binary image header(2048k). Using the size in the binary image header.
I (313) flash_encrypt: Flash encryption mode is RELEASE
I (319) sleep: Configure to isolate all GPIO pins in sleep state
I (326) sleep: Enable automatic switching of GPIO sleep configuration
I (333) app_start: Starting scheduler on CPU0
I (338) app_start: Starting scheduler on CPU1
I (338) main_task: Started on CPU0
I (348) main_task: Calling app_main()
I (348) example: Example configured to blink GPIO LED!
I (358) gpio: GPIO[5]| InputEn: 0| OutputEn: 0| OpenDrain: 0| Pullup: 1| Pulldown: 0| Intr:0
I (368) example: Turning the LED OFF!
I (1368) example: Turning the LED ON!
I (2368) example: Turning the LED OFF!
I (3368) example: Turning the LED ON!
9. 检查 eFuse 信息
使用 esptool 工具运行如下指令来获取芯片的 eFuse 信息
espefuse.py -p COM4 summary
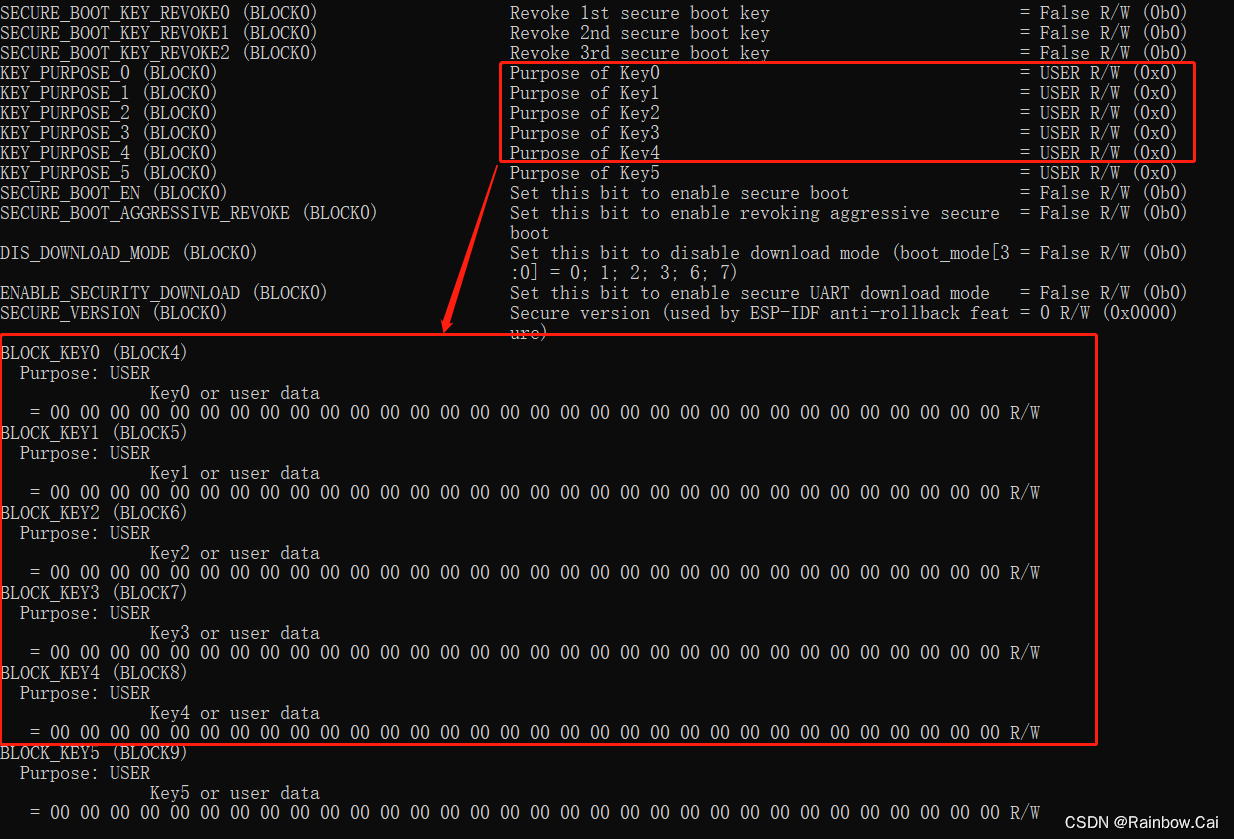
- 获取的芯片安全信息如下:
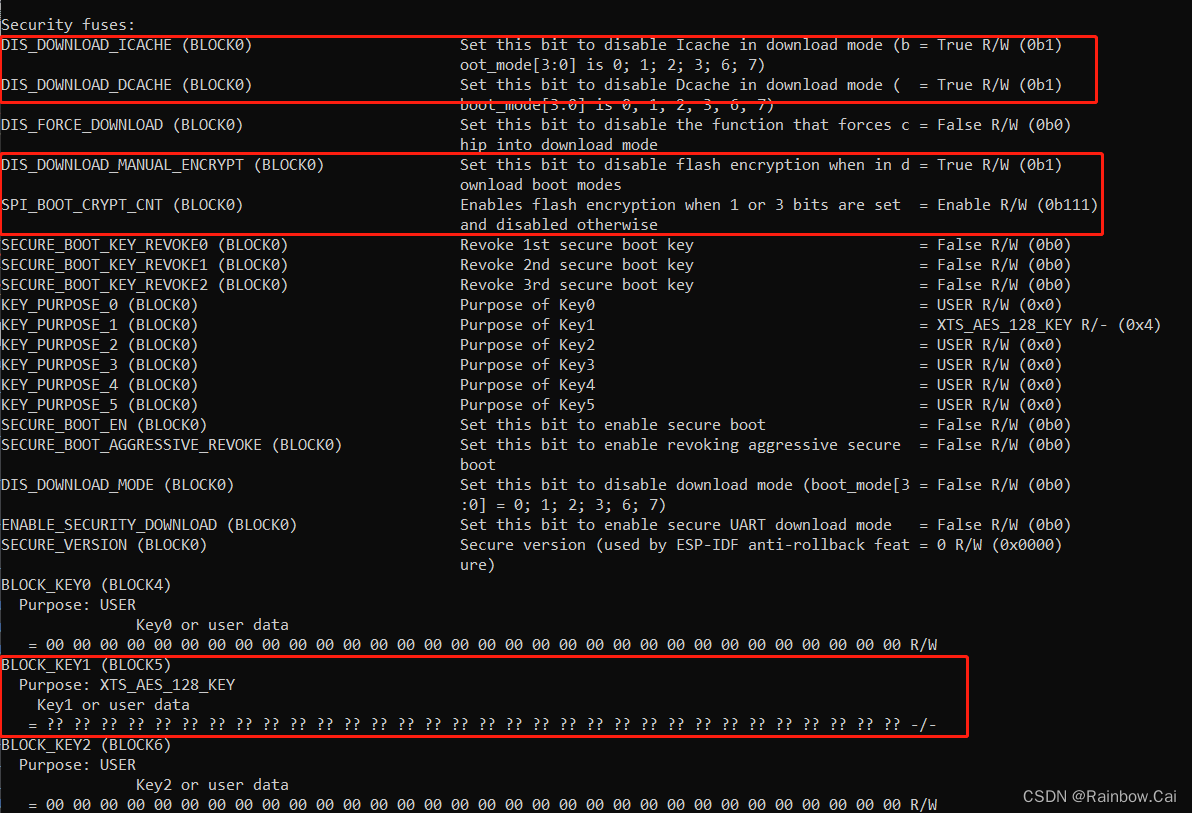
Security fuses:
DIS_DOWNLOAD_ICACHE (BLOCK0)                       Set this bit to disable Icache in download mode (b = True R/W (0b1)
                                                   oot_mode[3:0] is 0; 1; 2; 3; 6; 7)
DIS_DOWNLOAD_DCACHE (BLOCK0)                       Set this bit to disable Dcache in download mode (  = True R/W (0b1)
                                                   boot_mode[3:0] is 0; 1; 2; 3; 6; 7)
DIS_FORCE_DOWNLOAD (BLOCK0)                        Set this bit to disable the function that forces c = False R/W (0b0)
                                                   hip into download mode
DIS_DOWNLOAD_MANUAL_ENCRYPT (BLOCK0)               Set this bit to disable flash encryption when in d = True R/W (0b1)
                                                   ownload boot modes
SPI_BOOT_CRYPT_CNT (BLOCK0)                        Enables flash encryption when 1 or 3 bits are set  = Enable R/W (0b111)
                                                   and disabled otherwise
SECURE_BOOT_KEY_REVOKE0 (BLOCK0)                   Revoke 1st secure boot key                         = False R/W (0b0)
SECURE_BOOT_KEY_REVOKE1 (BLOCK0)                   Revoke 2nd secure boot key                         = False R/W (0b0)
SECURE_BOOT_KEY_REVOKE2 (BLOCK0)                   Revoke 3rd secure boot key                         = False R/W (0b0)
KEY_PURPOSE_0 (BLOCK0)                             Purpose of Key0                                    = USER R/W (0x0)
KEY_PURPOSE_1 (BLOCK0)                             Purpose of Key1                                    = XTS_AES_128_KEY R/- (0x4)
KEY_PURPOSE_2 (BLOCK0)                             Purpose of Key2                                    = USER R/W (0x0)
KEY_PURPOSE_3 (BLOCK0)                             Purpose of Key3                                    = USER R/W (0x0)
KEY_PURPOSE_4 (BLOCK0)                             Purpose of Key4                                    = USER R/W (0x0)
KEY_PURPOSE_5 (BLOCK0)                             Purpose of Key5                                    = USER R/W (0x0)
SECURE_BOOT_EN (BLOCK0)                            Set this bit to enable secure boot                 = False R/W (0b0)
SECURE_BOOT_AGGRESSIVE_REVOKE (BLOCK0)             Set this bit to enable revoking aggressive secure  = False R/W (0b0)
                                                   boot
DIS_DOWNLOAD_MODE (BLOCK0)                         Set this bit to disable download mode (boot_mode[3 = False R/W (0b0)
                                                   :0] = 0; 1; 2; 3; 6; 7)
ENABLE_SECURITY_DOWNLOAD (BLOCK0)                  Set this bit to enable secure UART download mode   = False R/W (0b0)
SECURE_VERSION (BLOCK0)                            Secure version (used by ESP-IDF anti-rollback feat = 0 R/W (0x0000)
                                                   ure)
BLOCK_KEY0 (BLOCK4)
  Purpose: USER
               Key0 or user data
   = 00 00 00 00 00 00 00 00 00 00 00 00 00 00 00 00 00 00 00 00 00 00 00 00 00 00 00 00 00 00 00 00 R/W
BLOCK_KEY1 (BLOCK5)
  Purpose: XTS_AES_128_KEY
    Key1 or user data
   = ?? ?? ?? ?? ?? ?? ?? ?? ?? ?? ?? ?? ?? ?? ?? ?? ?? ?? ?? ?? ?? ?? ?? ?? ?? ?? ?? ?? ?? ?? ?? ?? -/-
BLOCK_KEY2 (BLOCK6)
  Purpose: USER
               Key2 or user data
   = 00 00 00 00 00 00 00 00 00 00 00 00 00 00 00 00 00 00 00 00 00 00 00 00 00 00 00 00 00 00 00 00 R/W
BLOCK_KEY3 (BLOCK7)
说明
- 开启 Flash 加密功能后,如果没有禁用下载模式,则支持读取芯片 eFuse 信息。
- 开启 Flash 加密功能后,由于设置的是 Release 模式,因此不支持重烧固件。
- 仅支持通过 OTA 应用来更新固件,且 OTA 固件应该为明文固件